XRS Round 1 & a bit of RC3
Two posts in a week, the mind boggles. Be warned, this is a long one…
Anyway, this weekend was my first event with the Mugen MTC1, the opening round of the 2018 XRS series. This is a five round regional series, that visits a number of tracks in NSW and ACT. This is the second year the series has been run, and provides a bit of healthy inter-club competition. Round 1 was at my local track of SMA, and we had been running on the layout for a few weeks already.The main difference being that the XRS is a daytime meeting, instead of night, so that throws up different ambient conditions to contend with.
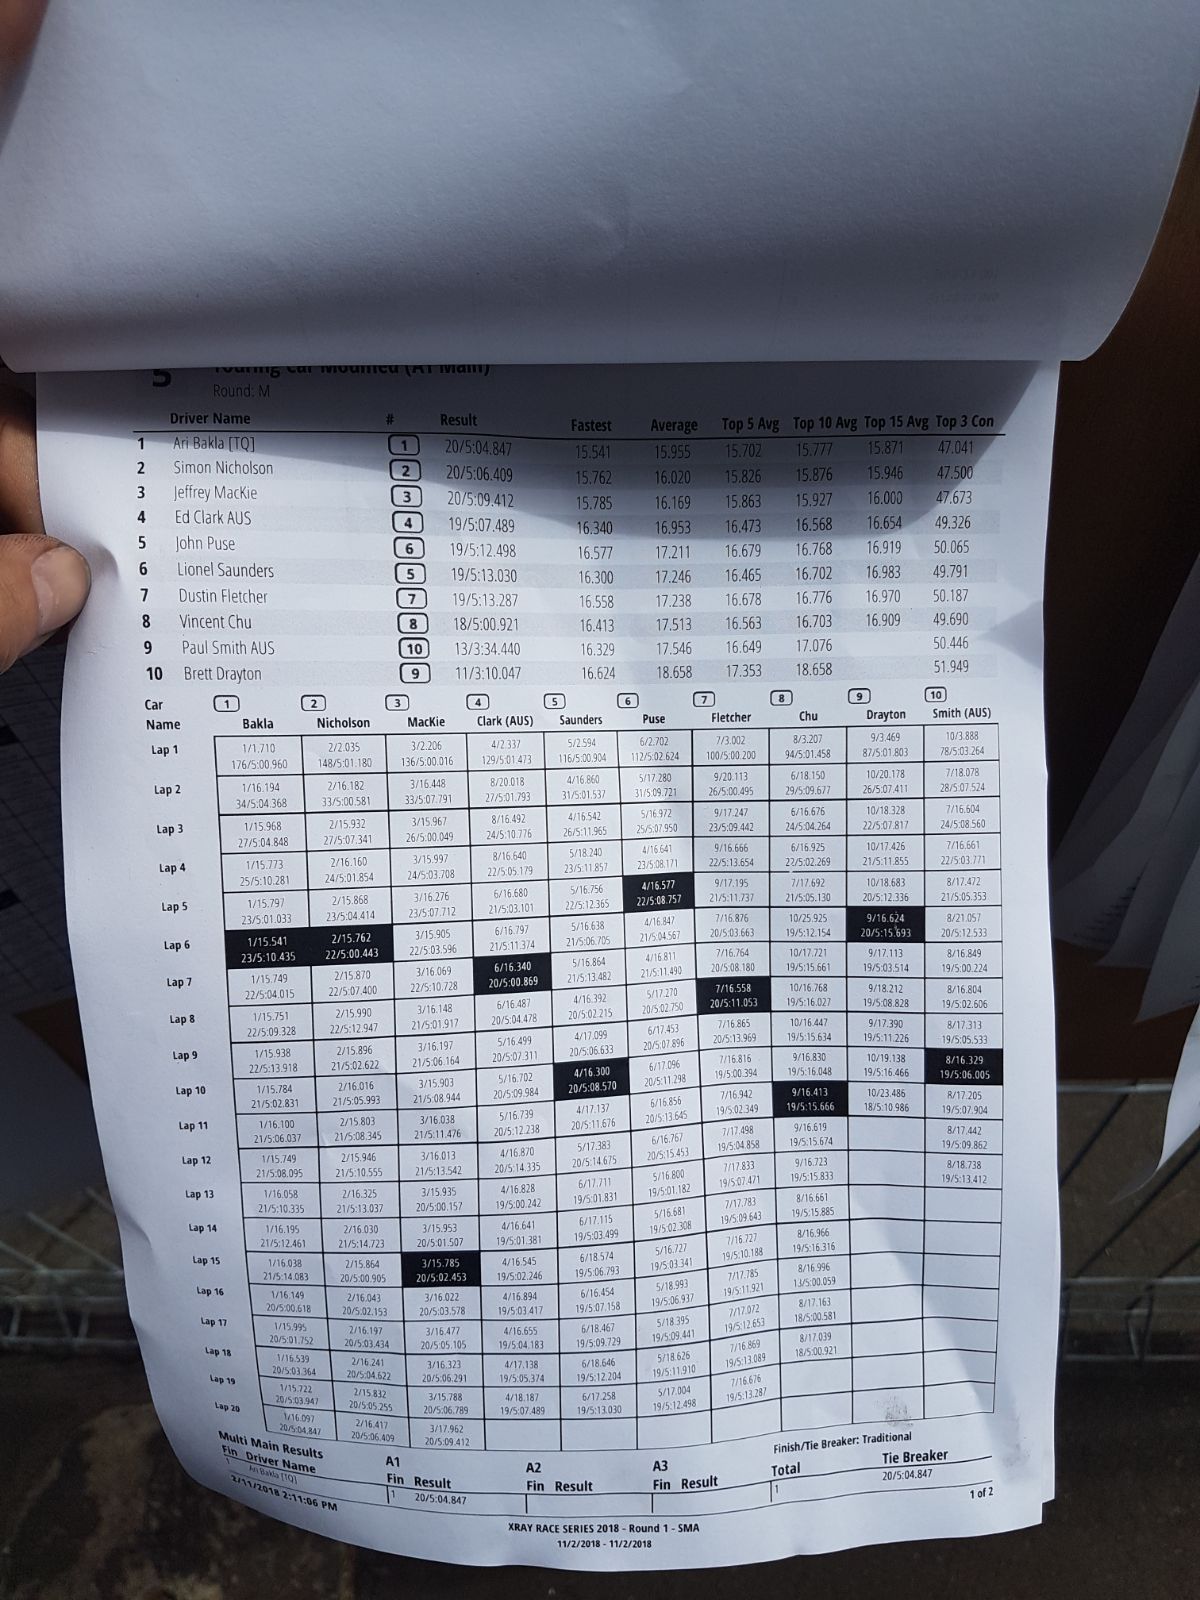
Saturday was a full practise day, whilst Sunday consists of 3 rounds of FTD qualifying, followed by three leg finals. Three touring car classes were run, with 21.5t blinky, 13.5t blinky and mod, and a solitary heat of 12th. As an aside, the blinky stock classes also have to use the XRS/Hobbywing Justock G2 motor as a control, whilst modified is any motor. We also get only one set of the Rush 36 control tyres to last the day… so getting a car working on old tyres is key, as come finals time they are shagged… :p
Anyway, onto the more important stuff. I had spent a bit of time in the lead up to the week doing some preparations. Two new bodies were painted up (a Protoform TypeS and a Montech Racer), cars given a little clean and fettle, and some measuring up to plug dimensions into RC Crew Chief (RC3) models.
The reason for the two new bodies is that I needed replace my current battle worn TypeS, so I painted up one of each of the current bodies of choice.
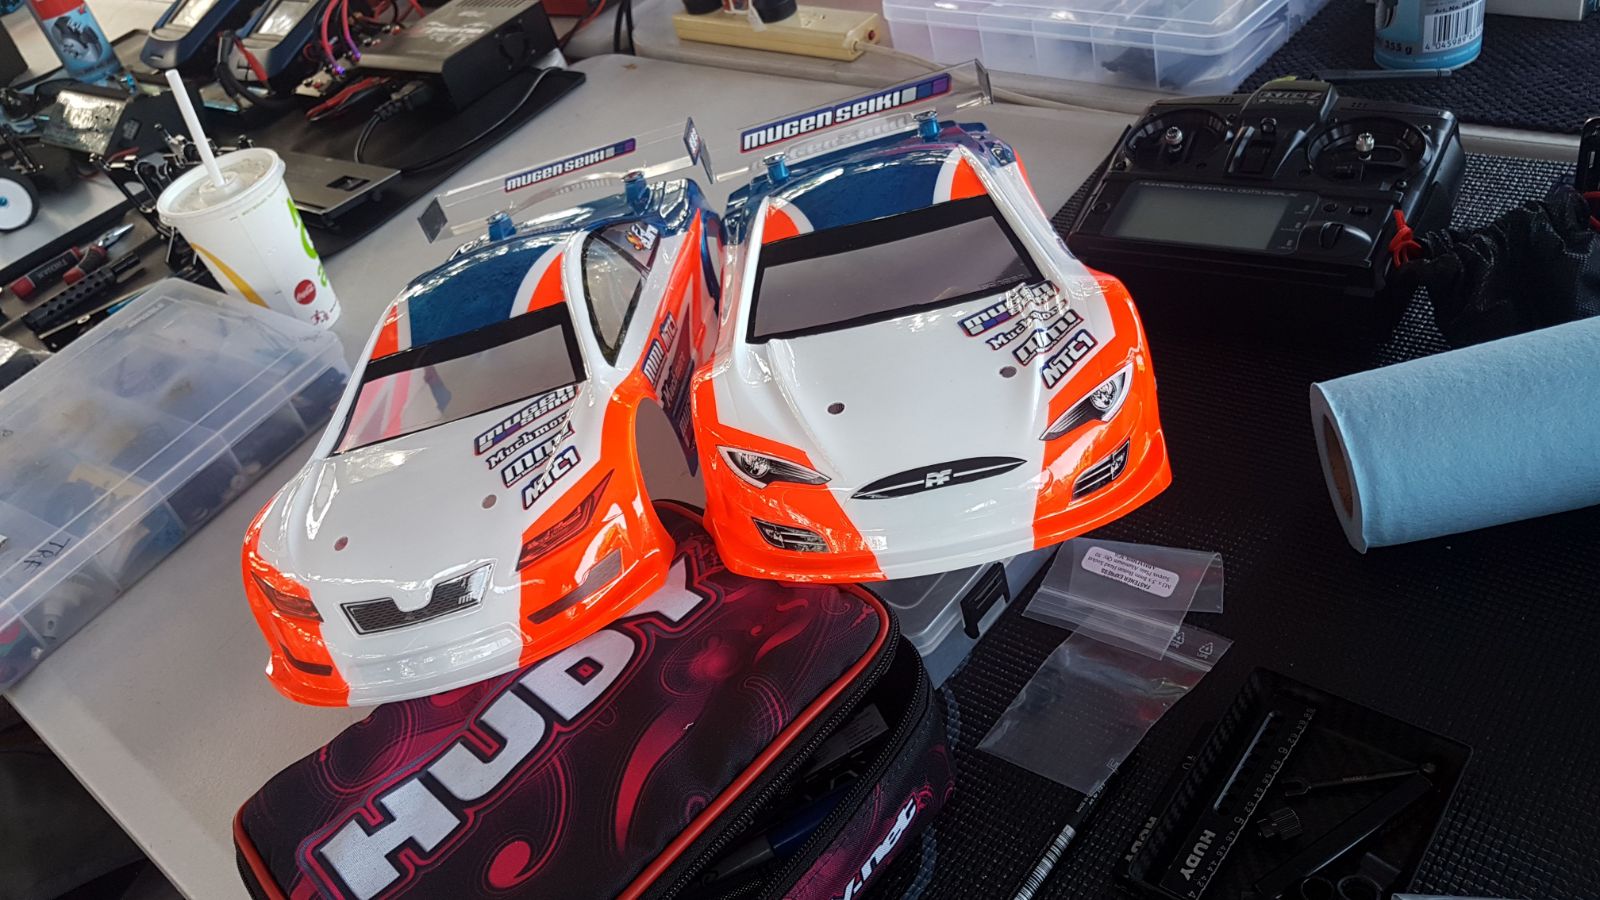
Racer and Type S ready to go
I did make a slight balls up mounting the new TypeS, as I hadn’t realised that the distance between the body posts and front wheel axles is different between the T4 and MTC1. So a ‘+2mm’ body on a T4 is more like a ‘+4mm’ on the MTC1… Long story short, I ended up with my new TypeS mounted at ‘+6mm’. This had me a bit worried it was going to be far too aggressive, opps! And yes, I am aware the body posts can be moved on the car to shift the body position. But I have it setup to the backwards position, so moving the posts would only have pushed the body even further forward, double oops! Anyhow…
So what is RC3? For those who don’t know, RC3 is a suite of software, that can tell you a lot about the suspension geometry (among other things) of your RC cars. It can provide tuning advice, and also see what adjustments do to the geometry. It’s quite a powerful and useful tool to help provide guidance on where to go with a setup direction. Me being me, I had plugged in models of Orange and Black cars to have a study of, and compare with the MTC1. It’s quite surprising how close a lot of the measurements are to one of the two in-particular, but there are also some differences too (which we’ll come back to later).
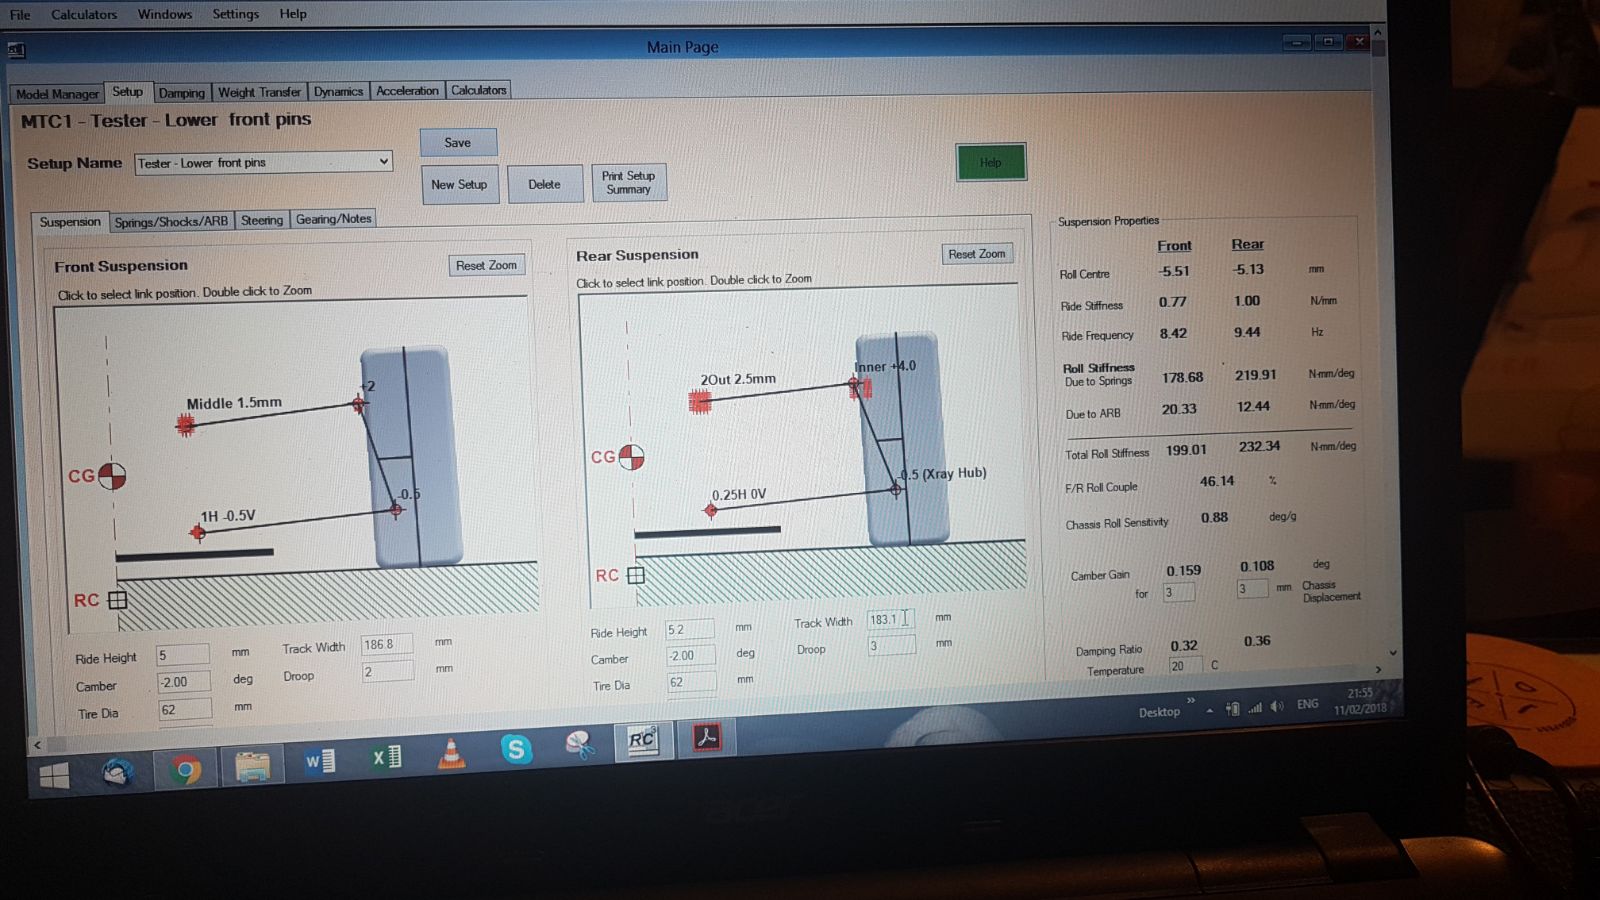
RC3 example of MTC1 setup (excuse the phone photo!)
I know some people at this point will be going… ‘Why are you looking at what others are doing? Every car is different’. Well, yes, they are. And there are other factors to consider as well (such as flex). But fundamentally, all cars follow the same principles with respect to the physics working on them. And the two brands I’m comparing to have by far the biggest R&D budgets and resources, and haven’t ended up in the position they are by chance and guess work. So to my mind it makes a lot of sense to investigate what they are doing, try to understand the why, and then apply it to the new car.
Back to the XRS, and Saturday. Practice was running in groups, and needing to mount up the Racer body, I missed the first few rounds. But given that I was already pretty happy with the car from recent running, I wasn’t too worried.
For the first run, I started out with the setup I had recently posted, as this was a good starting point, and then the next two tried out the new bodies. Both gave similar laptimes, with the Racer feeling a bit more stable and numb, whilst the TypeS was more aggressive and loose, which in all honesty I preferred, but both were slower than my current buggered body.
The next run I went back to the old body, and tried out a harder rear roll bar, and wider rear hexes. Up until this point I had been running the option A2225 4.5mm hexes front and rear, so I went back to the kit A2217 parts on the rear only. Having tried just the hexes on their own previously, I already knew that these would give more steering mid corner in particular, so the idea was for the harder rear roll bar to counter that a little, and bring back a bit of stability, with increased corner speed. This is exactly what happened, with better mid corner steering, but retaining the stability. Better lap speed, and especially noticeable in the higher speed corners.
Next up came lowering the front hinge pins. I had felt that up to that point that the front was quite reactive initially, but giving up a bit in the mid corner. Looking in RC3, I could see that the front rollcentre was actually higher than the rear, which would explain the reactive nature. So the theory goes that lowering the pins would lower the rollcentre, smoothing the initial steering, and then hopefully generating a bit more roll depth and grip mid corner. In terms of actual setting, I changed the Pins from FF 1.0 in + FR in & up to FF 1.0 & down + FR 1.0 in, so still keeping the anti-dive. And it worked… better steering feel, and giving up less mid corner. My pace was further improved, and the car was more consistent to drive.
With the geometry settings tested, I wanted to return to the the new Type S. In an effort to combat the loose nature, I switched out the standard wing for a Protoform Thick High Downforce wing, and mounted it further back. With a bit of help from a friend, a mid-run body swap between the old and new showed it was transformed. From being aggressive and loose, it was now aggressive, but with rear traction to match. Crucially, it was faster, and felt better to drive than the old body. Finally I managed to crack the 15s laps even with super old tyres.
With body and car setup sorted, time for the new tyre run. One run and and instant finding of 4/10ths of a second, down to 15.6s laptimes. Very happy with the progress for the day, on pace, with a setup that felt decent to drive. But there was one more battery left in the day, so I thought I’d have a bit of a play, and try out the experimental setup I had come up with during the week for run.
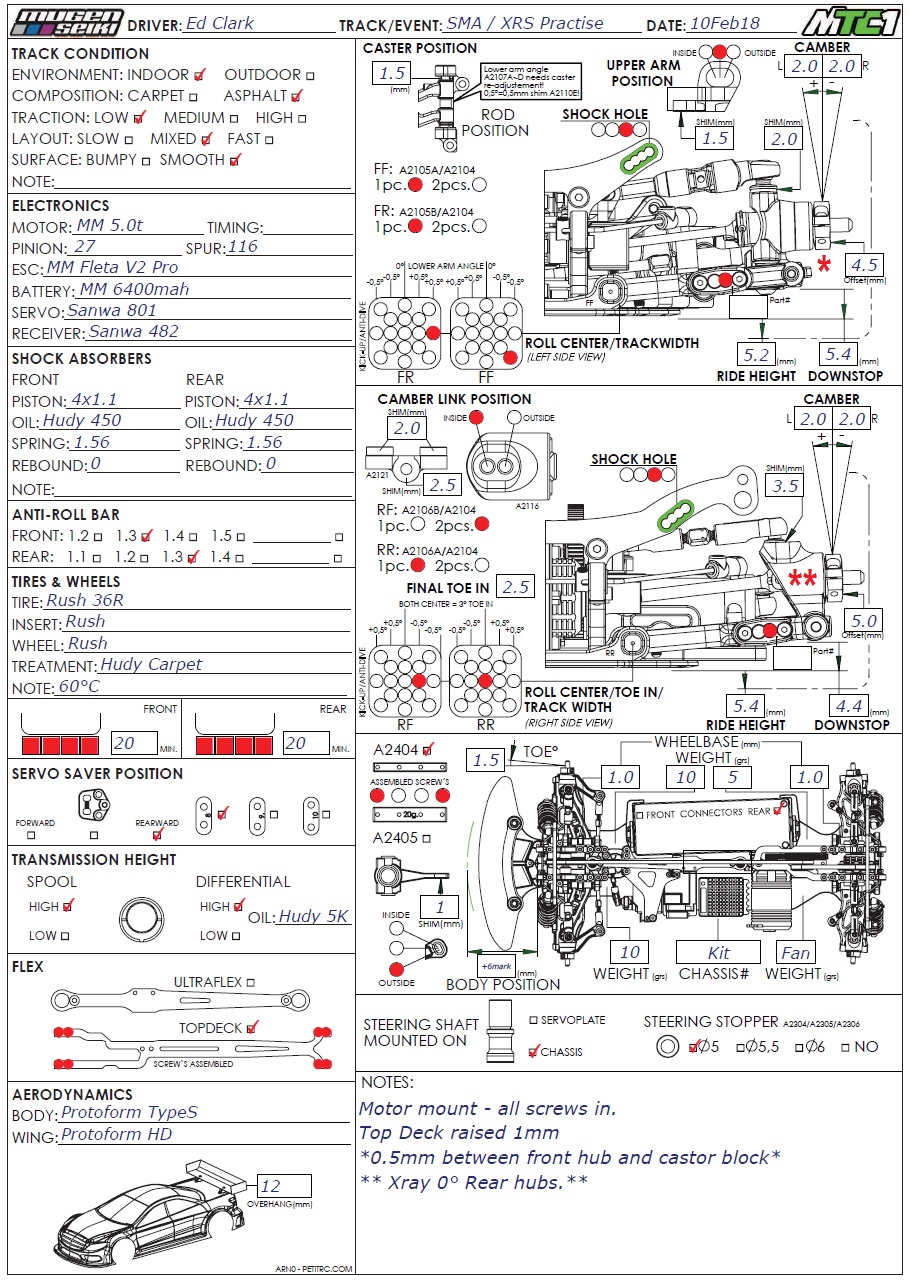
As mentioned earlier, I have been using RC3 to generate some ideas on setups. Part of that was to generate a setup that would give similar camber gain and roll centre to the black cars. One of the issues in trying to achieve comparable settings, is that the RC3 measuring had thrown up that the Mugen has a pin-to-axle height of 14mm, whilst the competitions cars are all 14.5mm. This means for a given camber gain, the Mugen would tend to have a lower roll centre. Try to match the roll centre, and you have higher camber gain. So the solution is to try to figure out how, on the Mugen, I could achieve this 14.5mm spacing.
Now the front is easy to do, and looking at the recent ETS setup from Robert Pietsch, the guys in Europe have been doing exactly that. It simply requires placing shims between the steering block and c-hub. To keep it easy, I used 0.5mm ID shims over the collar (A2138), before it slides into the bearing. With this lower, I also took the opportunity to widen the front pins, but whilst also keeping them low. (FF 1.0 down + out, FR 1.0 out). I also raised the upper inner link holders (A2111) with 1.5mm shims.
![]()
The rear is a little more tricky… the only real option being to switch out to a different brand c-hub. Now being I still have some on hand, I used Xray 0° Hard hubs. These lower the pin by 0.5mm, but are also 0.5mm higher on top. So to match the RC3 settings, I have 2.5mm on the inside of the camber link (with the A2121 mounted normally), and 3.5mm on top of the hub.
The last thing to note was having to reset the droop, as now the pins are lower relative to the axle, the car naturally has less droop. So I went down to F5.4/R4.4 on the gauge.
With that all done, and not knowing what to expect, I put the car on track. Straight away, it was very different to drive. Not as locked in, but great corner speed, and a balance and poise that had been missing before. The front was more settled, yet also more nimble in the tight corners. It needed to be a bit smoother, but having nailed a (slightly) faster fastest lap than the previous run on new tyres, I could happily do laps the whole run within a tenth or two, which was a big improvement. It was easy to drive AND fast too boot, seems the theory was working. And with that, Saturday was done!
And then it rained overnight…
So Sunday morning, the track was damp to start. Whilst I had wanted to have a quick run to test out the setup again, watching other cars go round on a still damp track, realised there wasn’t much point. Knowing that I had a car I was happy with for a more gripped up surface, I decided for qualifying 1 to take a punt and try a “super-low” grip setup, with a softer diff, the Ultra-flex top deck, and lower diffs. Whilst reasonably successful (we were now almost a full second slower than saturday!), it probably went too far, and the car was flexing a bit too much. 6th in round was not the best start, although the sun coming out for the second heat didn’t help.
So for Q2, and with the track improving, back to the one-piece top deck and high diffs. I kept the 3k diff, and also lowered the inner links to get a bit more bite out of the car in the lower grip. Much better, 3rd in round, just sneaking in for the 19th lap.
With further track evolution, for the final qual, I went back up to a 5k diff. A little harder to drive, and had a few bobbles, but somehow came out with a run almost 2s quicker for another 19lapper, and another 3rd in round. As it was FTD qualifying, that put me 4th on the grid, which given the competition (national champs and podium finishers) I was very happy with.
Car was starting to get a little too stuck, so for the first final, moved the links back up, and was back to the setup I ran on saturday afternoon. Got a decent start… and then promptly clipped a kerb and found the fence. Thankfully nothing damaged, but dropped from 4th to 8th, and lost around 4seconds. But with the car working really well, and a couple of force-full passes, managed to climb back up to 4th by the end. Pretty stoked with that result, and a fun race to drive, despite the initial error.
A1 – decent fight back from 8th on lap 1!
A2 was a bit more straightforward. Left the setup alone (which if any of the above is an indication, is very unusal!), and after a little battle in the first few corners, managed to make a break and ended up on my own for the rest of the run. Didn’t have enough speed to catch the fast boys, but more than enough to cover those behind. Another 4th place, and a 20 lap run. It was looking good for a decent overall result.
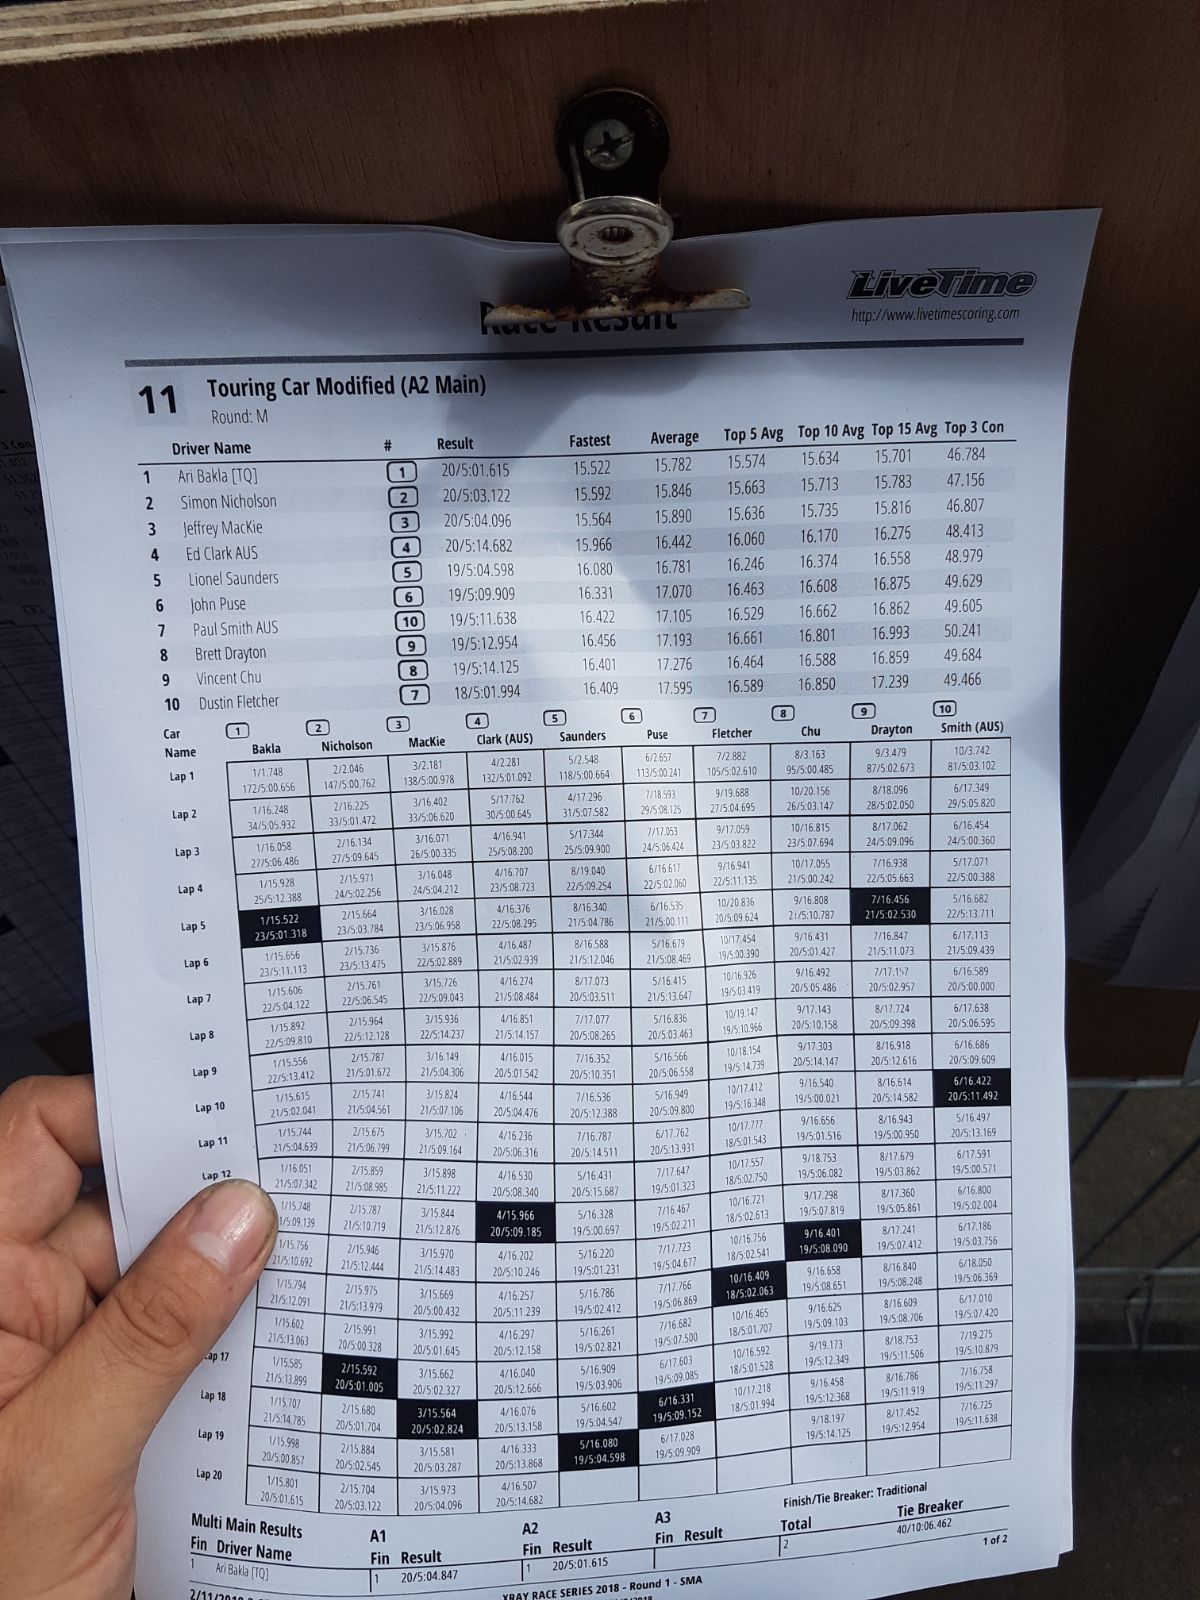
A2 – Fastest run of the day
And then A3. Unfortunately, my luck ran out. Had nowhere to go when one of the cars ahead spun in the sweeper on the second lap, collecting them at full pace, snapping a spool outdrive and dropping to 3wd. DNF. Throw in the overall winner sitting out the third leg, and the guys behind getting good leg results, and I ended up 6th overall. A disappointing end to the day, but that’s racing.
The biggest positive was that the car has very good pace and feel, and also worked well in both high and low grip… which suggests the balance is very close to spot on. Tyre wear was good as well, another indicator that the balance is working. Overall a positive weekend, and looking forward to more events with the car. Next up for me will be the Queensland State titles, which aren’t until April though.
XRS Round 1 – 11Feb18